moo cards

Friday, September 24, 2010

coffee cup cozy

freakapotimus.com » Blog Archive » Quick & Basic Coffee Cozy

Quick & Basic Coffee Cozy

I had some extra Swish left over from another project, and I thought: hey! What could I made with this? Something fast and simple, but also very useful. Coffee cozy time!

Coffee Cozy

I’ve found it best to put the cozy on the cup before filling it with coffee. I may modify the pattern to accommodate this issue.

Materials

  • KnitPicks Swish Lemongrass Heather
  • set of 4 US size 6 DPN (or 40″ circ for magic loop)

Gauge

6 sts + 9 rows = 1″ on US size 6 needles

Sizes

Stretchy enough to fit one to-go coffee/tea cup

Directions

Cast on 46 stitches and join in round.

Knit 4 rounds in K1P1 rib.

Knit 2 rounds.

Next round: K1 K2tog [K to last 3] SSK K1
Next 3 rounds: K

Repeat the above 4 rounds 4 more times.
(There should now be 36 stitches on the needles.)

Knit 1 more round.

Knit 4 rounds in K1P1 rib.

Finishing

BO all stitches and weave in ends. Enjoy your coffee!

for those of you that don't know what to do for Halloween yet...

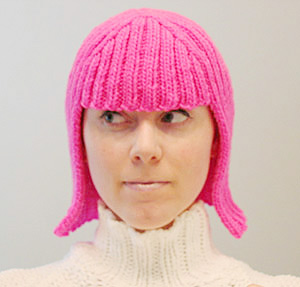
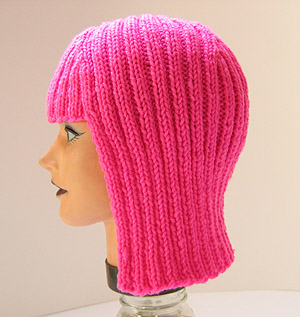
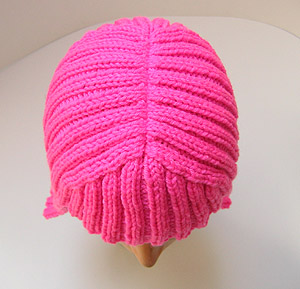
I found myself wondering just what I could do with all that cheap, bright acrylic yarn one finds in craft shops. I also found myself thinking about Halloween. Add in a bad hair day and this is what I got.

This wig is worked from the bottom up, the bound off edge is the center part.

model/photos: Megan Reardon


SIZE
One size fits all/Adult
FINISHED MEASUREMENTS
8 inches wide at widest point when flat (unstretched)
11 inches long when flat

MATERIALS

[ MC] Red Heart Kids [100% acrylic; 5oz.]; color: Pink, shade 2734

1 pair US #8/5mm needles
1 set of 5 US #8/5mm double-pointed needles OR
2 US #8/5mm circular needles (any length)
4 stitch markers, 2 each of 2 different colors
Tapestry needle

STITCH PATTERNS

[Knitty's list of standard abbreviations can be found here]

2 X 2 rib
Row 1 [RS]: K3, [p2, k2] to last st, k1.
Row 2 [WS]: P3, [k2, p2] to last st, p1.

GAUGE

28 sts/22 rows = 4 inches in 2x2 rib (unstretched)

DIRECTIONS
Wig
Using straight needles or one set of circulars, cast on 96 sts.
Work in 2 x 2 rib until the piece is as long as the distance between the bottom of your chin, and your eyebrow (about 6.5"), ending with a WS row.
NOTE: The extra stitches along the edge of the work will balance the width of the first and last ribs. Later on, when the bangs are added, these stitches will become parts of purl ribs.

If more length in the main body of the wig is desired, work more rows at this point.
Next row [RS]: work as before, but slip the first and last stitch.

Bangs
With RS facing and using backward loop cast on, loosely CO 32 sts. The backward loop cast on allows for plenty of stretch.
Div sts onto DPNs or circulars and join to work in the round with the RS of the wig facing out, being careful not to twist stitches. The first stitch will be a p; follow rib pattern after that.
Work in 2x2 rib for 10 rows.
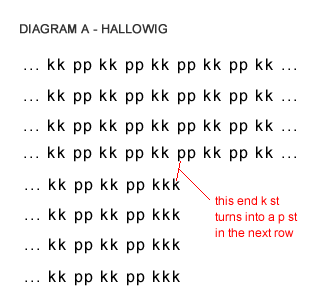
NOTE: The extra stitches that were at the beginning and end of the work up to this point become parts of purl ribs where the bangs join - see diagram A below for example.

If more length in the bangs is desired, work more rows at this point.

Work Decreases
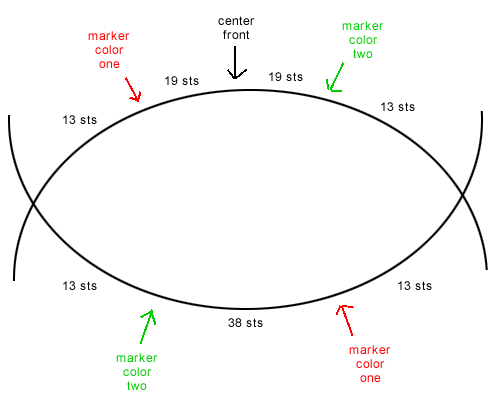
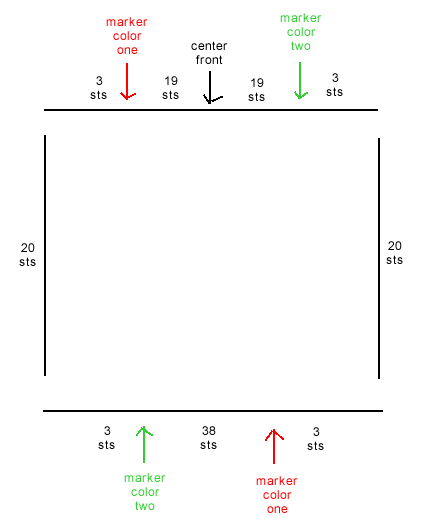
Using diagram B below as a guide, rearrange stitches on needles and add stitch markers.
(Diagram B shows placement for both double-pointed and circular needles.) When placing markers, begin counting from center front of bangs, which falls in the center of a purl rib.

NOTE: Decreases will be worked identically at the front and back of the wig. Markers have been placed one stitch away from decreases instead of directly next to decreases, for ease of working.

Begin decrease round by working decreases over bangs.
Decrease Round
*Work in rib as set to marker color 1, slip marker, k1, ssk, rib as set to 3 sts before marker color 2, k2tog, k1, slip marker.
Rep from *. Work this round every round until 6 sts rem between markers.
Work to marker color 1 (right edge of bangs section).
Next Round: *Sl marker, k1, ssk, k2tog, k1, sl marker, [p2tog, k2] to 2 sts before next marker, p2tog. Repeat from * once.
Remove st marker, k1, sl1, transfer the first half of the work (between center front and center back) to one DPN or circular needle, removing st markers, transfer the second half of the work to a second needle, cut yarn, leaving a 2-foot length for use in binding off.
Carefully flip work inside out, in preparation for working a 3-needle BO from the WS.
Work 3-needle BO tightly. (A crochet hook works well in place of a third needle.)

FINISHING

Weave in ends and turn right side out

ABOUT THE DESIGNER

Katherine Burgess- Bow-knot Scarf

Tuck-in or Bow-knot Scarf


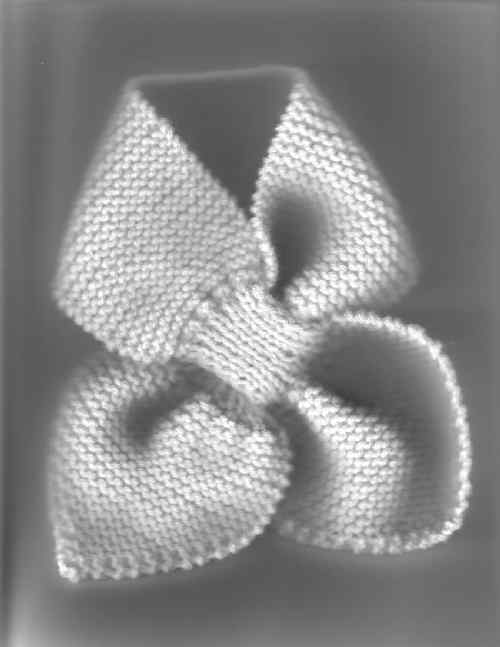
Katherine ScarfThis may be called a "Tuck-in or a Bow-knot" scarf.

This little scarf uses less than 50 grams of knitting worsted. You can knit it in any type of yarn, but for an adult, I prefer worsted weight.


Using 4.5 mm straight needles, cast on 3 sts.

Row 1: Increase 1 st in the first st. K to end of row.

Repeat 1st row to 24 sts on needle.

K 19 rows in garter st.

To make slot: *K1, slip next st onto a stitch holder, keeping this stitch at the back of the work. Repeat from * to end of row. Stitches are divided, half on needle and half on stitch holder.

Working on stitches on needle, work 16 rows in k1, p1 ribbing. Break yarn, and leave these sts on a spare needle.

Slip stitches from holder and work 16 rows in k1, p1 ribbing. Do not break
yarn.

Next row: (To close slot and increase stitches). *K tog 1 stitch from needle and 1 stitch from spare needle. Knit next stitch from front needle, then next stitch from back needle. (This increases 1 stitch.)

Repeat from * until there are 2 stitches left on each needle. (K tog one stitch from each needle) twice. 17 stitches on needle.

K even in garter stitch until work measures about 12 inches from slot closing. (I tend not to measure this, but to wrap it around my neck to make sure that it is long enough when stretched slightly.)

Next row: *K1, K2tog Repeat from * to last two sts. K2. (12 sts)

Work 16 rows in K1, P1 ribbing.

Next row: Increase 1 st in each st across row.

K 19 rows garter stitch.

Next row: K1, K2tog, K to end of row.

Repeat this row to 3 stitches on needle. Cast off.

Sew in ends. Enjoy!

Katherine Burgess- Bow-knot Scarf

"that's a wrap"


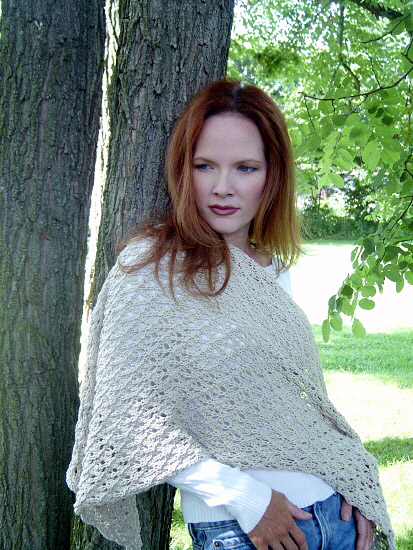
A little something to warm you up on a crisp fall day or when the boss hasn't figured out how to turn down the air conditioner.

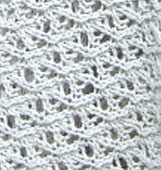
Use it as a lap blanket or something to snuggle around you and your sweetie to keep slightly toasty at the game, pair it with jeans and a sweater or an elegant dress and make everyone think you're oh-so-stylish and talented with this simple tweedy lace wrap.

models: Lori Tiller [with Sydney Tiller on cover] photos: Danielle Schoonover


SIZE
One
FINISHED MEASUREMENTS

Length: 67.5 inches
Width: 18.75 inches

MATERIALS

Reynolds Mandalay [100% silk; 98yds/88m per 50g skein]; color: #32 "oatfield"; 8 skeins

24-inch US #8/ 5mm circular needle
Tapestry needle for weaving in ends

GAUGE

18 sts/20 rows = 4" in stockinette stitch

STITCH PATTERN

[Knitty's list of standard abbreviations can be found here]

Feather Pattern (worked over multiple of 6 sts plus 1)
Row 1: K1, [YO, k2tog tbl, k1, k2tog, YO, k1] to end.
Row 2: P all sts.
Row 3: K1, [YO, k1, sl1, k2tog, psso, k1, YO, k1] to end.
Row 4: P all sts.
Row 5: K1, [k2tog, YO, k1, YO, k2tog tbl, k1]
Row 6: P all sts.
Row 7: K2tog, [k1, YO, k1, YO, k1, sl1, k2tog, psso] to last 5 sts, k1, YO, k1, YO, k1, k2tog tbl.
Row 8: P all sts.
Rep Rows 1 through 8.

DIRECTIONS

CO 85 sts.
Work 3 rows in garter st.
Switch to Feather Pattern and work in patt until piece measures approx. 67 inches, ending with Row 8.
Work 3 rows in garter st.
BO all sts.

FINISHING

Weave in ends. Block if desired.

knitty.com

Saturday, September 18, 2010

Crochet Necklace - Crochet Me

Crochet Necklace - Crochet Me

just wanted to share this pattern...
it's going to make wonderful xmas gifts!!! (shhhhh!!) ;o)

Wednesday, April 7, 2010

GREAT IDEA!!!!


Just came across this today...
here is the info I found:


Let's celebrate the 40th anniversary of Earth Day by using what we have instead of buying new!

Did you know that according to NAMTA, in the US, we spend $4.2 billion per year on art supplies, and many of those supplies are toxic and harmful to the environment? Instead of buying new, let's pledge to make April a craft destash month! Together, we can have a really big impact on the environment and on our own wallets.

Thursday, February 18, 2010

I haven't posted in a while, so I thought "better late than never" right?!?!

I haven't been knitting or crocheting near as much as I did before Christmas... I sort of needed to give my hands a break...

We've been house hunting, and that's been taking up most of my "craft" time.
but, it'll all be worth it in the end. :o)

I've managed to get a few projects done here and there... hoping to get more items listed on my ETSY site soon... www.mrsglass.etsy.com

hope everyone is having a good week...

FYI.. this saturday is "Love your pet day"