moo cards

Tuesday, September 28, 2010

great fall recipe

LowCarbRecipeBox : Message: Sweet Potato Casserole


I'm trying to get ideas for low carb, low fat, etc recipes for fall... since fall and winter is always when I gain weight..
I have found a few I'd like to share.. here is the first one!!

Sweet Potato Casserole

Sweet Potato Casserole

Sweet potatoes?! On a low-carb diet?! Many of us miss the flavor of sweet
potatoes in casseroles and more - especially in the Fall. The good news is
that by adding just 1/2 cup of real baked sweet potato to a couple of more
carb-friendly relatives (pumpkin and squash), we can extend the dish and
fool the tastebuds! A finishing sprinkling of our low-carb marshmallows and
you'll think you're cheating - but you're NOT!

Ingredients:
1 small sweet potato
(baked, cooled and mashed to make 1/2 cup)
1/2 cup canned pumpkin
1 medium summer squash
(halved, seeded, baked and mashed to make 1 cup)
4 eggs
2/3 cup heavy cream
1 tsp xanthan gum
1/2 stick butter
1/2 tsp salt
1 tsp cinnamon
Dash of allspice
Dash of cloves
1/2 cup Splenda®
1 tsp Brown Sugar Twin®
4 drops of yellow and 1 drop red food color [optional]
Marshmallows for topping (See Low Carb Marshmallows recipe)
Prepare sweet potato and squash to their recipe ready condition as listed
above. Ingredients should be room temperature. Preheat oven to 325°F.
Butter a 9-12" casserole dish.

In large mixing bowl, stir together mashed sweet potato, pumpkin, and mashed
squash (any summer squash is acceptable here). If some lumps remain, don't
worry about it - they add a little character to the dish! In a separate bowl
beat eggs with xanthan gum, Splenda and Brown Sugar Twin. Add heavy cream
and mix (with hand mixer) until well mixed and beginning to thicken.

Add egg/cream mixture to sweet potato mixture and stir by hand to mix
lightly. Add salt, spices and food color (if you wish to use it.) Mix to
distribute. You may wish to taste here for your sweetness and spice
preference. If more is needed, add it now.

Spoon mixture into buttered casserole dish and smooth to even out. Cut
remainder of 1/2 stick butter (after using some to butter dish) into thin
pats and distribute them over top of casserole. Optionally, you can sprinkle
a bit of extra cinnamon on top. Bake for 35-45 minutes until browned at
edges and cracking a bit. Remove from oven and cool 10 minutes before
sprinkling with marshmallows.

NOTE: You can top this dish with artificially sweetened meringue instead of
marshmallows if you prefer. If you use meringue, give the dish a few moments
under the broiler to brown the meringue tips before serving.

40 grams carbs (allowing for fiber) in entire recipe.
Makes 6 servings. 6.5 grams per serving.

Friday, September 24, 2010

amazing sweater I'd love to make sometime...

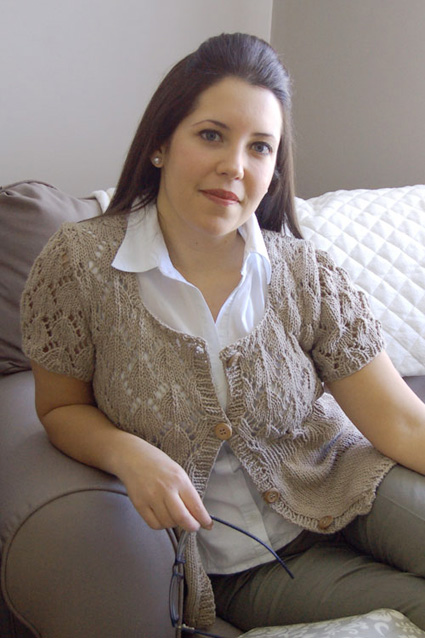
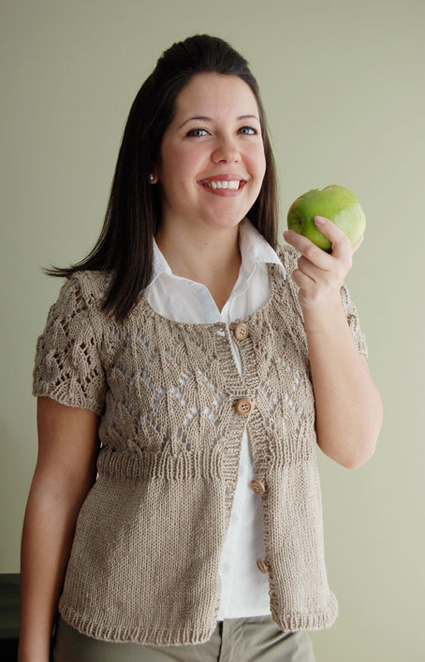
What to call this sweater? Let me think… I’ve been designing for over 25 years so after a while, I just run out of ideas. So, in honor of my daughter (the volunteered model) and her dedication to her profession (high school history teacher), I’m calling this one “Hey, Teach!”

When I came up with this idea, I could see wearing a tank top underneath it in a very casual way. So I sent her off to get ready for the photo expecting that. True to her own style, she totally dressed it up with a collared blouse, turning this easy-wear garment into a playtime-to-office piece in an instant.

I am particularly fond of this “baby doll” fit. I think it flatters all shapes – it adds hips to the boyish figure, and hides hips of the pear-shaped. You could even work a drawstring in and out of the first row of lace for an added detail.

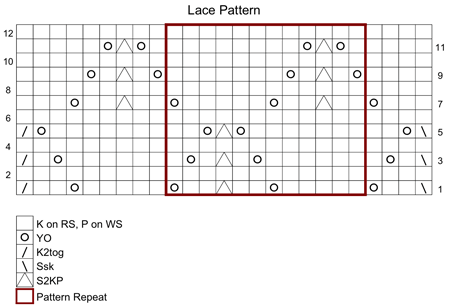
The yoke lace pattern is easy enough to master but requires you to pay attention to your YOs and matching decreases throughout the underarm and neck shaping so you don’t end up with too many or too few stitches.

I used 2nd Time Cotton, an eco-friendly recycled cotton yarn, as a nod to Mother Earth.

model: Kelly-Anne Rush photos: Hélène Rush


SIZE
XS [S, M, L, 1X, 2X, 3X] (shown in size S)
FINISHED MEASUREMENTS

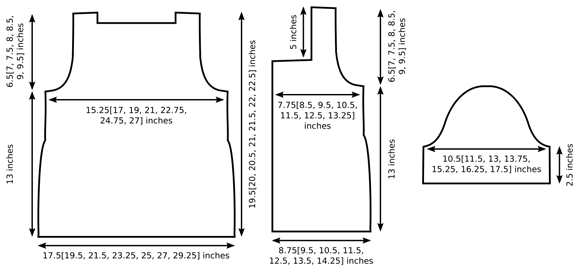
Chest: 32.25[35.5, 39, 43, 46.75, 50.75, 55] inches
Length: 19.5[20, 20.5, 21, 21.5, 22, 22.5] inches

MATERIALS

Knit One, Crochet Too 2nd Time Cotton [75% recycled cotton, 25% acrylic; 180yd/165m per 100g ball]; color #810 Linen; 3[4, 4, 5, 5, 6, 6] balls

Recommended needle size:
1 pair US #8/5mm straight needles
[always use a needle size that gives you the gauge listed below -- every knitter's gauge is unique]

2 stitch markers
4 stitch holders
Tapestry needle
4 buttons, 0.75 inch diameter


GAUGE

17 sts/24 rows = 4 inches in stockinette stitch

PATTERN NOTES

[Knitty's list of standard abbreviations and techniques can be found here]

Shaping Note:
Within the lace pattern, each [yo] is paired with a decrease. When increasing or decreasing at edge of work (ie. when shaping armholes and neckline), be sure to keep lace pattern correct. Do not work a [yo] if there are not enough sts to work its accompanying decrease.

S2KP: Slip next 2 sts to right needle as if to knit them together; k next st, pass both slipped stitches, together, over stitch just knit. Forms a centered double decrease.

1x1 Rib (Worked over an odd number of sts):
Row 1 [RS]: K1, [p1, k1] to end.
Row 2 [WS]: P1, [k1, p1] to end.
Repeat these 2 rows for 1x1 Rib.

Please note:
"Lace pattern" refers to the entire width of the chart below, not just what's inside the red square.


DIRECTIONS

BACK
CO 75[83, 91, 99, 107, 115, 125] sts.
Work 4 rows in 1x1 Rib, ending with a WS row.
Work in stockinette st until work measures 8 inches from CO edge, ending with a RS row.

Next Row [WS]: P5[5, 4, 8, 8, 7, 8], p2tog, [p5(6, 7, 7, 8, 9, 10), p2tog] nine times, p5[4, 4, 8, 7, 7, 7]. 65[73, 81, 89, 97, 105, 115] sts.

Work 8 rows in 1x1 Rib, ending with a WS row.

Bodice:
Set-up Row [RS]: K2[0, 4, 2, 0, 4, 3], work in Lace Pattern to last 2[0, 4, 2, 0, 4, 3] sts, k2[0, 4, 2, 0, 4, 3]. This row sets pattern for bodice. Pattern Repeat section outlined in red is worked 4[5, 5, 6, 7, 7, 8] times in each row.

Continue in pattern as set, maintaining 2[0, 4, 2, 0, 4, 3] sts at each edge in stockinette st, until work measures 13 inches, ending with a WS row.

Shape Armholes:
Note: See “Shaping Note” in Pattern Notes, above.

BO 4[5, 6, 7, 8, 9, 10] sts at beginning of next 2 rows. 57[63, 69, 75, 81, 87, 95] sts.

Next Row [RS]: K1, k2tog, work in pattern to last 3 sts, ssk, k1.
P 1 row.
Repeat these 2 rows 1[1, 2, 2, 3, 3, 4] times more. 53[59, 63, 69, 73, 79, 85] sts.

Continue in pattern until work measures 18.5[19, 19.5, 20, 20.5, 21, 21.5] inches (armhole measures 5.5[6, 6.5, 7, 7.5, 8, 8.5] inches), ending with a WS row.

Shape Back Neckline:
Next Row [RS]: Work 13[15, 16, 18, 19, 21, 23] sts in pattern, place next 27[29, 31, 33, 35, 37, 39] sts on st holder, join new ball of yarn and work last 13[15, 16, 18, 19, 21, 23] sts in pattern.
Work 5 more rows in pattern, working each set of 13[15, 16, 18, 19, 21, 23] sts using attached ball of yarn. Work measures 19.5[20, 20.5, 21, 21.5, 22, 22.5] inches.
BO both sets of sts.

LEFT FRONT
CO 37[41, 45, 49, 53, 57, 61] sts.
Work 4 rows in 1x1 Rib, ending with a WS row.
Work in stockinette st until work measures 8 inches from CO edge, ending with a RS row.

Next Row [WS]: [P6(7, 8, 9, 10, 11, 12), p2tog] four times, p5. 33[37, 41, 45, 49, 53, 57] sts.

Work 8 rows in 1x1 Rib, ending with a WS row.

Bodice:
Set-up Row [RS]: K2[0, 4, 2, 0, 4, 3], work 25[37, 37, 37, 49, 49, 49] sts in Lace Pattern, k6[0, 0, 6, 0, 0, 5]. This row sets pattern for bodice. Pattern Repeat section outlined in red is worked 1[2, 2, 2, 3, 3, 3] times in each row.

Continue in pattern as set until work measures 13 inches, ending with a WS row.

Shape Armholes:
Note: See “Shaping Note” in Pattern Notes, above.

Next Row [RS]: BO 4[5, 6, 7, 8, 9, 10] sts, continue in pattern to end. 29[32, 35, 38, 41, 44, 47] sts

P 1 row.
Next Row [RS]: K1, k2tog, work in pattern to end.
Repeat these 2 rows 1[1, 2, 2, 3, 3, 4] times more. 27[30, 32, 35, 37, 40, 42] sts.

Continue in pattern until work measures 14.5[15, 15.5, 16, 16.5, 17, 17.5] inches (armhole measures 1.5[2, 2.5, 3, 3.5, 4, 4.5] inches), ending with a WS row.

Shape Neckline:
Next Row [RS]: Work 13[15, 16, 18, 19, 21, 23] sts in pattern, place last 14[15, 16, 17, 18, 19, 19] sts on st holder.
Work remaining sts in pattern until work measures same as back to shoulder.
BO all sts.

RIGHT FRONT
CO 37[41, 45, 49, 53, 57, 61] sts.
Work 4 rows in 1x1 Rib, ending with a WS row.
Work in stockinette st until work measures 8 inches from CO edge, ending with a RS row.

Next Row [WS]: P5, [p2tog, p6(7, 8, 9, 10, 11, 12)] four times. 33[37, 41, 45, 49, 53, 57] sts.

Work 8 rows in 1x1 Rib, ending with a WS row.

Bodice:
Set-up Row [RS]: K6[0, 0, 6, 0, 0, 5], work 25[37, 37, 37, 49, 49, 49] sts in Lace Pattern, k2[0, 4, 2, 0, 4, 3]. This row sets pattern for bodice. Pattern Repeat section outlined in red is worked 1[2, 2, 2, 3, 3, 3] times in each row.

Continue in pattern as set until work measures 13 inches, ending with a RS row.

Shape Armholes:
Note: See “Shaping Note” in Pattern Notes, above.

Next Row [WS]: BO 4[5, 6, 7, 8, 9, 10] sts, p to end. 29[32, 35, 38, 41, 44, 47] sts

Next Row [RS]: Work in pattern to last 3 sts, ssk, k1.
P 1 row.
Repeat these 2 rows 1[1, 2, 2, 3, 3, 4] times more. 27[30, 32, 35, 37, 40, 42] sts.

Continue in pattern until work measures 14.5[15, 15.5, 16, 16.5, 17, 17.5] inches (armhole measures 1.5[2, 2.5, 3, 3.5, 4, 4.5] inches), ending with a RS row.

Shape Neckline:
Next Row [WS]: P13[15, 16, 18, 19, 21, 23], place last 14[15, 16, 17, 18, 19, 19] sts on st holder.
Work remaining sts in pattern until work measures same as back to shoulder.
BO all sts.

SLEEVES (Make 2)
CO 45[49, 55, 59, 65, 69, 75] sts.
Work 4 rows in 1x1 Rib.

Set-up Row [RS]: K4[0, 3, 5, 2, 4, 1], work 37[49, 49, 49, 61, 61, 73] sts in Lace Pattern, k4[0, 3, 5, 2, 4, 1]. This row sets pattern for sleeve. Pattern Repeat section outlined in red is worked 2[3, 3, 3, 4, 4, 5] times in each row.

Continue in pattern as set, maintaining 4[0, 3, 5, 2, 4, 1] sts at each edge in stockinette st, until work measures 2.5 inches, ending with a WS row.

Shape Sleeve Cap:
BO 4[5, 6, 7, 8, 9, 10] sts at beginning of next 2 rows. 37[39, 43, 45, 49, 51, 55] sts.

Next Row [RS]: K1, k2tog, work in pattern to last 3 sts, ssk, k1.
P 1 row.
Repeat these 2 rows 6[7, 10, 11, 13, 14, 15] times more. 23[23, 21, 21, 21, 21, 23] sts.

BO 2 sts at beginning of next 6 rows.

BO remaining 11[11, 9, 9, 9, 9, 11] sts.

FINISHING

Weave in ends and block pieces to measurements shown in schematic.
Sew shoulder seams.

Neckline Ribbing:
With RS facing, k held 14[15, 16, 17, 18, 19, 19] sts of right front neckline, place marker; pick up and k 28 sts (approx. 3 sts for every 4 rows) along vertical front and back neckline edge, place marker; k held 27[29, 31, 33, 35, 37, 39] sts of back neckline, placing marker before last st; pick up and k 28 sts along vertical back and front neckline edge, placing marker before last st; k held 14[15, 16, 17, 18, 19, 19] sts of left front neckline. 111[115, 119, 123, 127, 131, 133] sts.

Row 1 [WS]: P1[2, 1, 2, 1, 2, 2], [k1, p1] to last 0[1, 0, 1, 0, 1, 1] sts, p0[1, 0, 1, 0, 1, 1].
Row 2 [RS]: [Work in 1x1 Rib as set to 1 st before marker, S2KP, removing marker] four times, continue in 1x1 Rib as set to end.
BO remaining 103[107, 111, 115, 119, 123, 125] sts in pattern.

Button Band:
With RS facing, beginning at upper corner of left front edge, pick up and k 73[75, 77, 79, 81, 83, 87] sts (approx. 4 sts for every 5 rows) along left front edge.
Work 5 rows in 1x1 Rib. BO all sts in pattern.

Buttonhole Band:
With RS facing, beginning at lower corner of right front edge, pick up and k 73[75, 77, 79, 81, 83, 87] sts along right front edge.
Work 2 rows in 1x1 Rib.

Buttonhole Row [WS]: Work 3 sts in pattern, [yo, k2tog, work 16(16, 17, 17, 18, 18, 19) sts in pattern] 3 times, yo, k2tog, continue in pattern to end.
Work 2 rows in 1x1 Rib. BO all sts in pattern.

Sew buttons to button band opposite buttonholes.
Sew sleeves into armholes.
Sew sleeve seams and side seams.
Weave in any remaining ends.
ABOUT THE DESIGNER

Hélène Rush is the mom of both Kelly-Anne, the model in the photos, and Knit One, Crochet Too, the yarn company. Her sons Jonathan and Benjamin both work with her but have yet to be converted into knitters (they do however know their yarns!).

She’s been living with yarn since learning how to knit from the nuns in Montreal in first grade. She must have been a very good girl because she gets to play with yarn all day now.


coffee cup cozy

freakapotimus.com » Blog Archive » Quick & Basic Coffee Cozy

Quick & Basic Coffee Cozy

I had some extra Swish left over from another project, and I thought: hey! What could I made with this? Something fast and simple, but also very useful. Coffee cozy time!

Coffee Cozy

I’ve found it best to put the cozy on the cup before filling it with coffee. I may modify the pattern to accommodate this issue.

Materials

  • KnitPicks Swish Lemongrass Heather
  • set of 4 US size 6 DPN (or 40″ circ for magic loop)

Gauge

6 sts + 9 rows = 1″ on US size 6 needles

Sizes

Stretchy enough to fit one to-go coffee/tea cup

Directions

Cast on 46 stitches and join in round.

Knit 4 rounds in K1P1 rib.

Knit 2 rounds.

Next round: K1 K2tog [K to last 3] SSK K1
Next 3 rounds: K

Repeat the above 4 rounds 4 more times.
(There should now be 36 stitches on the needles.)

Knit 1 more round.

Knit 4 rounds in K1P1 rib.

Finishing

BO all stitches and weave in ends. Enjoy your coffee!

for those of you that don't know what to do for Halloween yet...

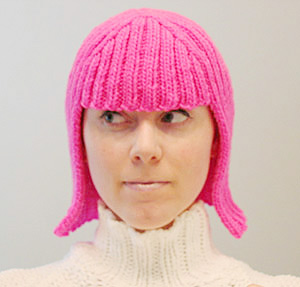
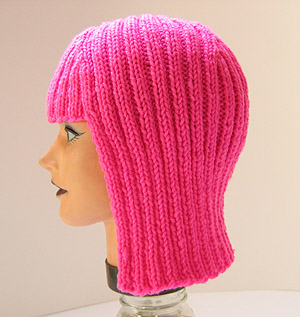
I found myself wondering just what I could do with all that cheap, bright acrylic yarn one finds in craft shops. I also found myself thinking about Halloween. Add in a bad hair day and this is what I got.

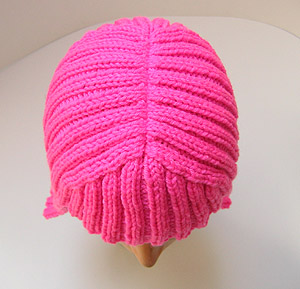
This wig is worked from the bottom up, the bound off edge is the center part.

model/photos: Megan Reardon


SIZE
One size fits all/Adult
FINISHED MEASUREMENTS
8 inches wide at widest point when flat (unstretched)
11 inches long when flat

MATERIALS

[ MC] Red Heart Kids [100% acrylic; 5oz.]; color: Pink, shade 2734

1 pair US #8/5mm needles
1 set of 5 US #8/5mm double-pointed needles OR
2 US #8/5mm circular needles (any length)
4 stitch markers, 2 each of 2 different colors
Tapestry needle

STITCH PATTERNS

[Knitty's list of standard abbreviations can be found here]

2 X 2 rib
Row 1 [RS]: K3, [p2, k2] to last st, k1.
Row 2 [WS]: P3, [k2, p2] to last st, p1.

GAUGE

28 sts/22 rows = 4 inches in 2x2 rib (unstretched)

DIRECTIONS
Wig
Using straight needles or one set of circulars, cast on 96 sts.
Work in 2 x 2 rib until the piece is as long as the distance between the bottom of your chin, and your eyebrow (about 6.5"), ending with a WS row.
NOTE: The extra stitches along the edge of the work will balance the width of the first and last ribs. Later on, when the bangs are added, these stitches will become parts of purl ribs.

If more length in the main body of the wig is desired, work more rows at this point.
Next row [RS]: work as before, but slip the first and last stitch.

Bangs
With RS facing and using backward loop cast on, loosely CO 32 sts. The backward loop cast on allows for plenty of stretch.
Div sts onto DPNs or circulars and join to work in the round with the RS of the wig facing out, being careful not to twist stitches. The first stitch will be a p; follow rib pattern after that.
Work in 2x2 rib for 10 rows.
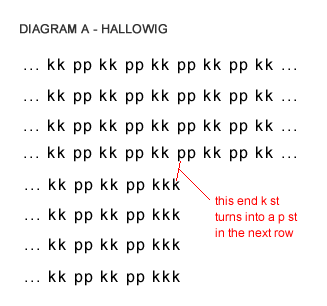
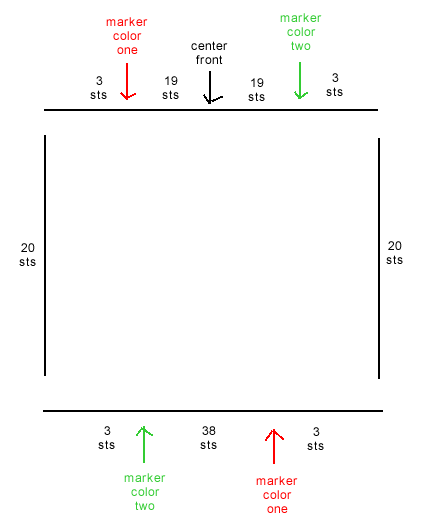
NOTE: The extra stitches that were at the beginning and end of the work up to this point become parts of purl ribs where the bangs join - see diagram A below for example.

If more length in the bangs is desired, work more rows at this point.

Work Decreases
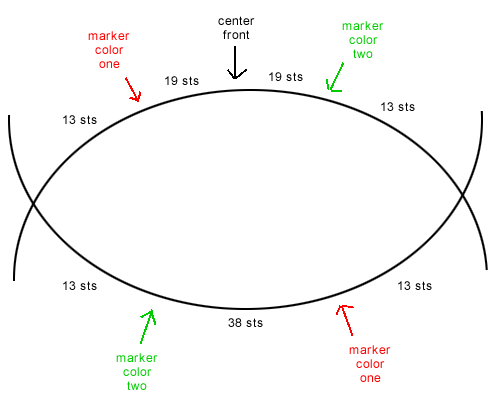
Using diagram B below as a guide, rearrange stitches on needles and add stitch markers.
(Diagram B shows placement for both double-pointed and circular needles.) When placing markers, begin counting from center front of bangs, which falls in the center of a purl rib.

NOTE: Decreases will be worked identically at the front and back of the wig. Markers have been placed one stitch away from decreases instead of directly next to decreases, for ease of working.

Begin decrease round by working decreases over bangs.
Decrease Round
*Work in rib as set to marker color 1, slip marker, k1, ssk, rib as set to 3 sts before marker color 2, k2tog, k1, slip marker.
Rep from *. Work this round every round until 6 sts rem between markers.
Work to marker color 1 (right edge of bangs section).
Next Round: *Sl marker, k1, ssk, k2tog, k1, sl marker, [p2tog, k2] to 2 sts before next marker, p2tog. Repeat from * once.
Remove st marker, k1, sl1, transfer the first half of the work (between center front and center back) to one DPN or circular needle, removing st markers, transfer the second half of the work to a second needle, cut yarn, leaving a 2-foot length for use in binding off.
Carefully flip work inside out, in preparation for working a 3-needle BO from the WS.
Work 3-needle BO tightly. (A crochet hook works well in place of a third needle.)

FINISHING

Weave in ends and turn right side out

ABOUT THE DESIGNER

Katherine Burgess- Bow-knot Scarf

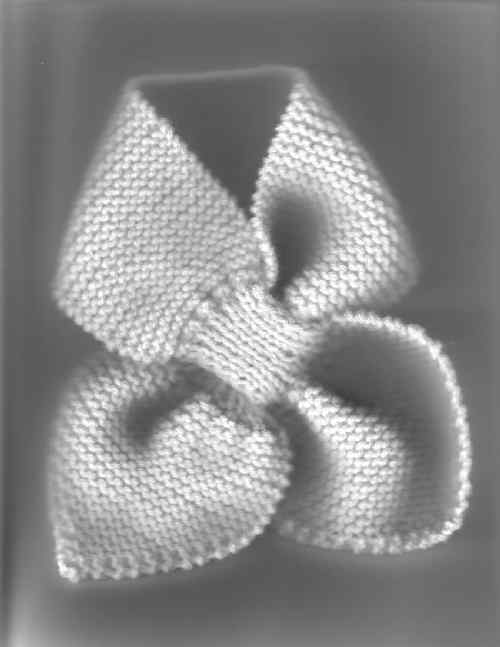
Tuck-in or Bow-knot Scarf


Katherine ScarfThis may be called a "Tuck-in or a Bow-knot" scarf.

This little scarf uses less than 50 grams of knitting worsted. You can knit it in any type of yarn, but for an adult, I prefer worsted weight.


Using 4.5 mm straight needles, cast on 3 sts.

Row 1: Increase 1 st in the first st. K to end of row.

Repeat 1st row to 24 sts on needle.

K 19 rows in garter st.

To make slot: *K1, slip next st onto a stitch holder, keeping this stitch at the back of the work. Repeat from * to end of row. Stitches are divided, half on needle and half on stitch holder.

Working on stitches on needle, work 16 rows in k1, p1 ribbing. Break yarn, and leave these sts on a spare needle.

Slip stitches from holder and work 16 rows in k1, p1 ribbing. Do not break
yarn.

Next row: (To close slot and increase stitches). *K tog 1 stitch from needle and 1 stitch from spare needle. Knit next stitch from front needle, then next stitch from back needle. (This increases 1 stitch.)

Repeat from * until there are 2 stitches left on each needle. (K tog one stitch from each needle) twice. 17 stitches on needle.

K even in garter stitch until work measures about 12 inches from slot closing. (I tend not to measure this, but to wrap it around my neck to make sure that it is long enough when stretched slightly.)

Next row: *K1, K2tog Repeat from * to last two sts. K2. (12 sts)

Work 16 rows in K1, P1 ribbing.

Next row: Increase 1 st in each st across row.

K 19 rows garter stitch.

Next row: K1, K2tog, K to end of row.

Repeat this row to 3 stitches on needle. Cast off.

Sew in ends. Enjoy!

Katherine Burgess- Bow-knot Scarf

"that's a wrap"


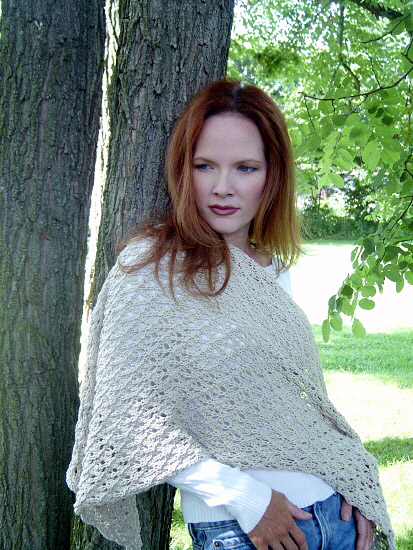
A little something to warm you up on a crisp fall day or when the boss hasn't figured out how to turn down the air conditioner.

Use it as a lap blanket or something to snuggle around you and your sweetie to keep slightly toasty at the game, pair it with jeans and a sweater or an elegant dress and make everyone think you're oh-so-stylish and talented with this simple tweedy lace wrap.

models: Lori Tiller [with Sydney Tiller on cover] photos: Danielle Schoonover


SIZE
One
FINISHED MEASUREMENTS

Length: 67.5 inches
Width: 18.75 inches

MATERIALS

Reynolds Mandalay [100% silk; 98yds/88m per 50g skein]; color: #32 "oatfield"; 8 skeins

24-inch US #8/ 5mm circular needle
Tapestry needle for weaving in ends

GAUGE

18 sts/20 rows = 4" in stockinette stitch

STITCH PATTERN

[Knitty's list of standard abbreviations can be found here]

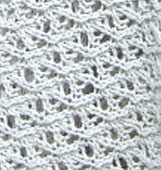
Feather Pattern (worked over multiple of 6 sts plus 1)
Row 1: K1, [YO, k2tog tbl, k1, k2tog, YO, k1] to end.
Row 2: P all sts.
Row 3: K1, [YO, k1, sl1, k2tog, psso, k1, YO, k1] to end.
Row 4: P all sts.
Row 5: K1, [k2tog, YO, k1, YO, k2tog tbl, k1]
Row 6: P all sts.
Row 7: K2tog, [k1, YO, k1, YO, k1, sl1, k2tog, psso] to last 5 sts, k1, YO, k1, YO, k1, k2tog tbl.
Row 8: P all sts.
Rep Rows 1 through 8.

DIRECTIONS

CO 85 sts.
Work 3 rows in garter st.
Switch to Feather Pattern and work in patt until piece measures approx. 67 inches, ending with Row 8.
Work 3 rows in garter st.
BO all sts.

FINISHING

Weave in ends. Block if desired.

knitty.com

Saturday, September 18, 2010

Crochet Necklace - Crochet Me

Crochet Necklace - Crochet Me

just wanted to share this pattern...
it's going to make wonderful xmas gifts!!! (shhhhh!!) ;o)