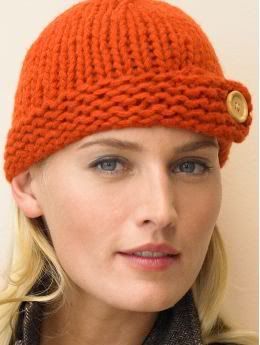
I saw this hat at Banana Republic last year and fell in love with it. But, like most things at BR it was ridiculously overpriced ($50, I think). Since it goes against every moral fiber in my body to pay that much for a hat, I whipped up my own pattern.
Mine:

The Original:

I changed a few things, like using seed stitch for the band instead of garter stitch and making it a little bit longer to cover my ears all the way. And it only cost $5 to make! Take that, Banana Republic!
Pattern:
Yarn: Lion's Brand Wool-Ease, Thick & Quick
Needles: US 8 29" circulars and US 10.5 dpns
Notions: One big ol' funky button, needle and thread
The band of the hat is knit flat:
Using circular needles to accommodate the number of sts, CO 75 sts, leaving a fairly long tail (don't join). Knit seed stitch *P1, K1* for 9 rows.
Row 10: Bind off 13 sts (this is the button flap) - 62 sts remain.
Change to dpns: K10, place marker (pm), K11, pm, K10, pm, K10, pm, K10, pm, K10, pm, k2tog to join round.
Knit 13 more rounds (Several people have mentioned that their hats have turned out a little short. I would recommend trying on your hat at this point and seeing if it is your desired length. If not, knit an extra round or two (or three) and then continue with the remaining pattern)
Begin decreasing: k2tog before each marker. Continue to do so until only 7 sts remain.
Break yarn leaving a fairly long tail. Pull tail through remaining sts, pull tight, and knot.
Now, try on the hat. Pull the button flap until the hat band is to desired fit. Remove hat, holding button flap in place (I used a dpn to keep it in place). Using the tail from the CO sts, stitch the bottom edge of the band and button flap together. Using a needle and thread, attach your button to the button flap.
This is the first pattern I've ever written. Hopefully I explained it okay. If you have any questions please pm me and I'll try to help you out. If anyone makes this hat, please post pictures! I would love to see how they turn out!
P.S.: I added it to Ravelry, too. I'm still learning how to use the site, but it seems pretty awesome so far.

No comments:
Post a Comment